To help you get started, we've put together step-by-step instructions on how to navigate and use the platform. We've also compiled a list of common questions and their answers, so you can quickly find the information you need. Should you encounter any difficulties or have further inquiries, please don't hesitate to reach out to us for further assistance.
For the best experience, we recommend using the platform on your desktop computer.
We want the platform to be a hub of active, available counsellors that youth can reach out to in high confidence. As one of our practitioners, this creates expectations related to your waiting time, response time, and public presence which you can review in our terms and conditions.
Simply click on the following link to log in to your account: https://app.gumbootfriday.org.nz/login
So you can easily access the platform, we recommend adding this link to your browser’s bookmarks.
To reset your password, please follow these steps:
To update the email address associated with your account, please follow these steps:


Two-Factor Authentication (2FA) provides additional security for your account. When it’s turned on, you’ll be asked to enter a time-sensitive verification code from an authenticator app on your phone after entering your password.
To enable Two-Factor Authentication (2FA), please follow these steps:

To set up your availability for the first time, please follow these steps:

If we notice that your availability hasn't been updated in a while, we'll send you a reminder email asking you to update it.
Alternatively, you can log in to the practitioner platform to update your availability at any time. To do so, please follow these steps:
To update your public profile information, please follow these steps:


To view your public profile, please follow these steps:
Alternatively, you can search for your name on the Youth Platform: https://help.gumbootfriday.org.nz/
To upload your new Annual Practicing Certificate, please follow these steps:


To hide your public profile, please follow these steps:
To update your practice location, please follow these steps:
On the platform, practitioners are displayed in two ways: as a grid or on a map.
If you don't offer in-person sessions, rest assured that your address will not be made public. Your profile won't appear on the map.
As a practitioner offering in-person sessions, we do require an address in order to display your profile on the map. If you are uncomfortable sharing your address, you can simply enter your street address or a nearby location.
We totally get it if you're hesitant about sharing personal information, like your hobbies, on your public profile. Our feedback from young people shows that they often struggle to reach out to mental health practitioners due to a fear of not connecting. This is why we suggest adding your hobbies to your profile - to help young people decide if they are comfortable connecting with you.
We allow young people to contact up to three practitioners of their choice. This ensures that they receive timely responses and receive support when they need it most.
We expect our practitioners to respond to incoming client requests within two working days. We also kindly ask that you update the client request's status on the platform as their contact progresses (e.g. Replied to, Accepted, etc.). This helps us ensure that every young person is receiving care from a practitioner, and keep track of where they are in this journey.
In the system, if you're the first practitioner to accept a young person into your care by adding them as a client, they will be allotted two sessions to begin with.
You’ll receive an email notification each time a young person contacts you.
To read a new request, please follow these steps:


You must only ever proceed to change the status to ACCEPTED if both you and the young person have confirmed a session date and time.
To update the status of a request, please follow these steps:
To ensure that all requests are promptly and appropriately addressed, we kindly request you to keep your request statuses up-to-date.


Here's what each status means:
You must only ever proceed to change the status to ACCEPTED if both you and the young person have confirmed a session date and time.
The "Accept" status should be used immediately when you and the client have both confirmed your first session together.
When working with a request, please ensure you are logged in and checked the request's status prior to confirming a session. This is to verify that the prospective client has not already been "Accepted by a peer". The platform does not allow a client to be accepted by multiple practitioners.
After you "Accept" a request, please add them as a client directly after using "From Gumboot Friday" in the New client section.
This two-step process helps us forecast our funding, and gives you time to gather the information required to add new clients, such as school level, referral source, region, and so on. We encourage you to enquire for this information during your initial conversation when scheduling your first session. This data is essential for our fundraising to support the platform, and directly contributes to our sustainability. If required, you can clarify to the young person that this step is a required procedure of Gumboot Friday’s system.
To ensure that young people receive timely and consistent care and avoid feelings of distress caused by extended waiting periods, we have introduced a feature that allows them to make contact with up to three preferred practitioners at once, and eventually select the one they feel is best for them.
If a request is marked as 'Accepted by peer,' it indicates that another chosen practitioner has been in contact with and confirmed they will provide care for the young person.
When we tested the new platform, we found that one of the biggest hurdles was young people feeling like they were "locking in" when picking one practitioner and freezing out of fear that they could pick the wrong match or not be responded to. Our solution is letting youth reach out to a few practitioners at a time, and "locking in" with one when both sides have confirmed they will book a session.
Equally important, when testing the new platform many practitioners expressed that unresponsive clients were stressful. It was hard to know what happened, and if someone had a Duty of Care. To give more clarity around this, “Accepted by peer” is made visible to show a young person is in contact with another practitioner.
When a request to multiple practitioners is sent through Gumboot Friday, it’s made clear that only one practitioner should be seen at a time. It’s possible that the young person has forgotten or missed this, so we ask you clarify this with the young person if it arises.
We realise that this change adds a new requirement, but we request your support with this change, as it is important young people are given every chance to find the right therapist for them. We know you understand it's important not to pressure or urge them to reconsider their decision. We also ask that you ensure they understand there is no pressure to choose you, and that it’s not in any way awkward if they decide to see a different practitioner.
If the young person wants to change their choice, this can be done in two ways.
We do not mediate these situations. We trust our practitioners and expect they use our platform collaboratively, conduct themselves ethically and always prioritising the best interests of our young people.
When a request to multiple practitioners is sent through Gumboot Friday, it’s made clear that only The "Quick notes" feature in your client's "Care Focus" section allows you to note anything important regarding a client that you want to keep track of on the Gumboot Friday platform. Please note that while I Am Hope does not access your clients' Quick Notes in day-to-day operations, we may encounter them when maintaining the platform's data or review them in the event of an emergency.
To ensure that our funding can go as far as possible, we currently fund sessions in blocks of two. We pay our practitioners fortnightly.
We expect that you will be looking for alternative sources of long-term funding to support your client. If your client has exhausted other sources, is on a public waitlist, or likewise cannot access additional funding, you may apply for additional sessions in batches of two, up to six total funded sessions in total. Please note that this funding is not granted to sessions retroactively and is considered on a case-by-case basis depending on need. It is your responsibility to apply for funding before you undertake additional sessions. Please refer to Terms and Conditions should you require more information concerning conditions of extra session requests.
To add a new client, please follow these steps:


We kindly request that all sessions be entered into the system before they occur.
We do not permit the creation of sessions with past times. This policy ensures that we maintain accurate control over fund allocation and enables us to have a clear view of future distribution. This approach is essential for the sustainable management of the Gumboot Friday fund.
To add a session booked with a client, please follow these steps:


To view your session list, please follow these steps:
To view your session agenda, please follow these steps:
To import your Gumboot Friday calendar into your Google Calendar, please follow these steps:
Please note that this calendar import feature is subject to the limitations and restrictions of external calendars like Google Calendar, Outlook Calendar, etc.


To update a session as completed and trigger a future payment, please follow these steps:


To change the date and/or time of a session, please follow these steps:


To update a session as cancelled or no-show, please follow these steps:
No, a cancelled or no show session does not count towards the two sessions initially allocated to a client.
To request additional sessions for your client, please follow these steps:
Extra funding will be allocated by the discretion of Gumboot Friday administrators. With the exception of extenuating circumstances sessions are capped at 6 for all clients.


Archiving a client
To archive a client, please follow these steps:

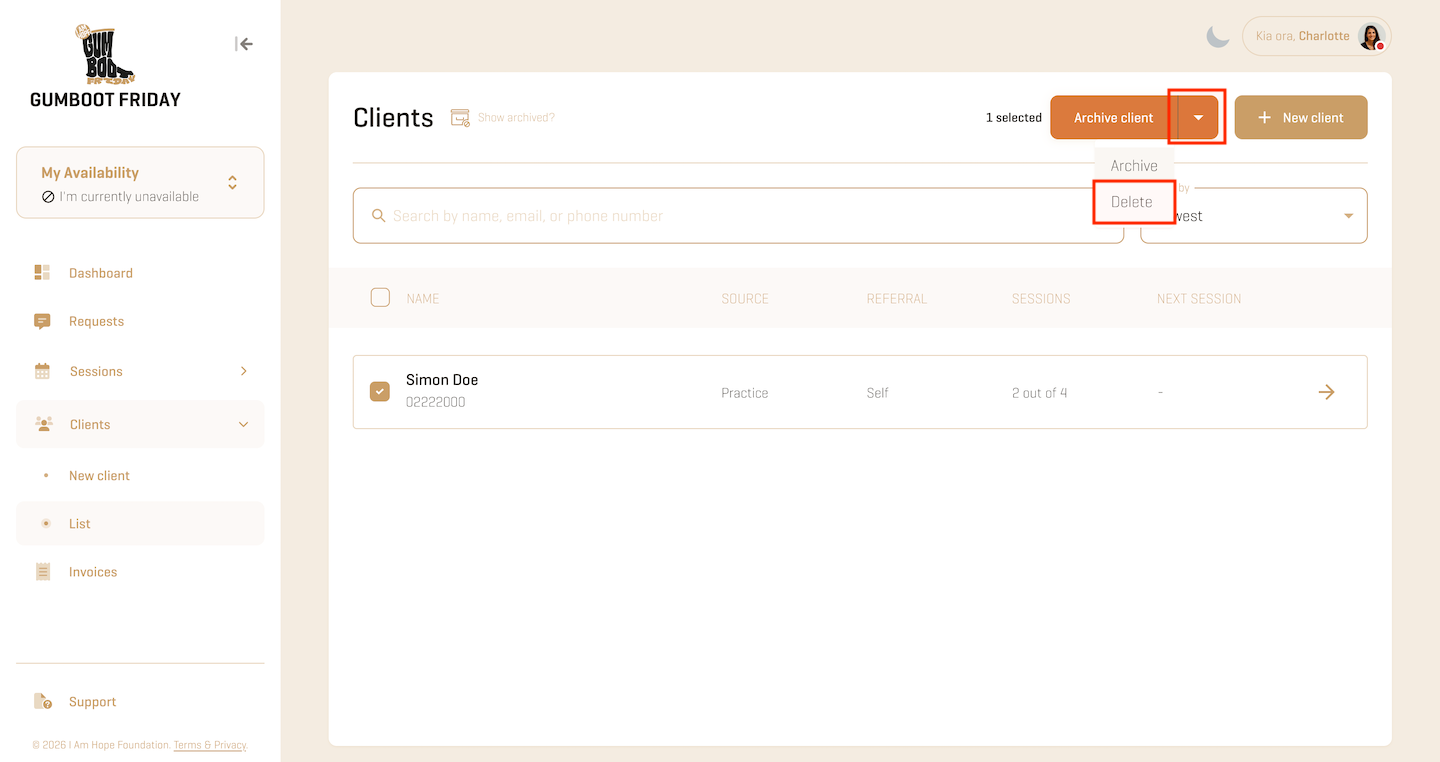
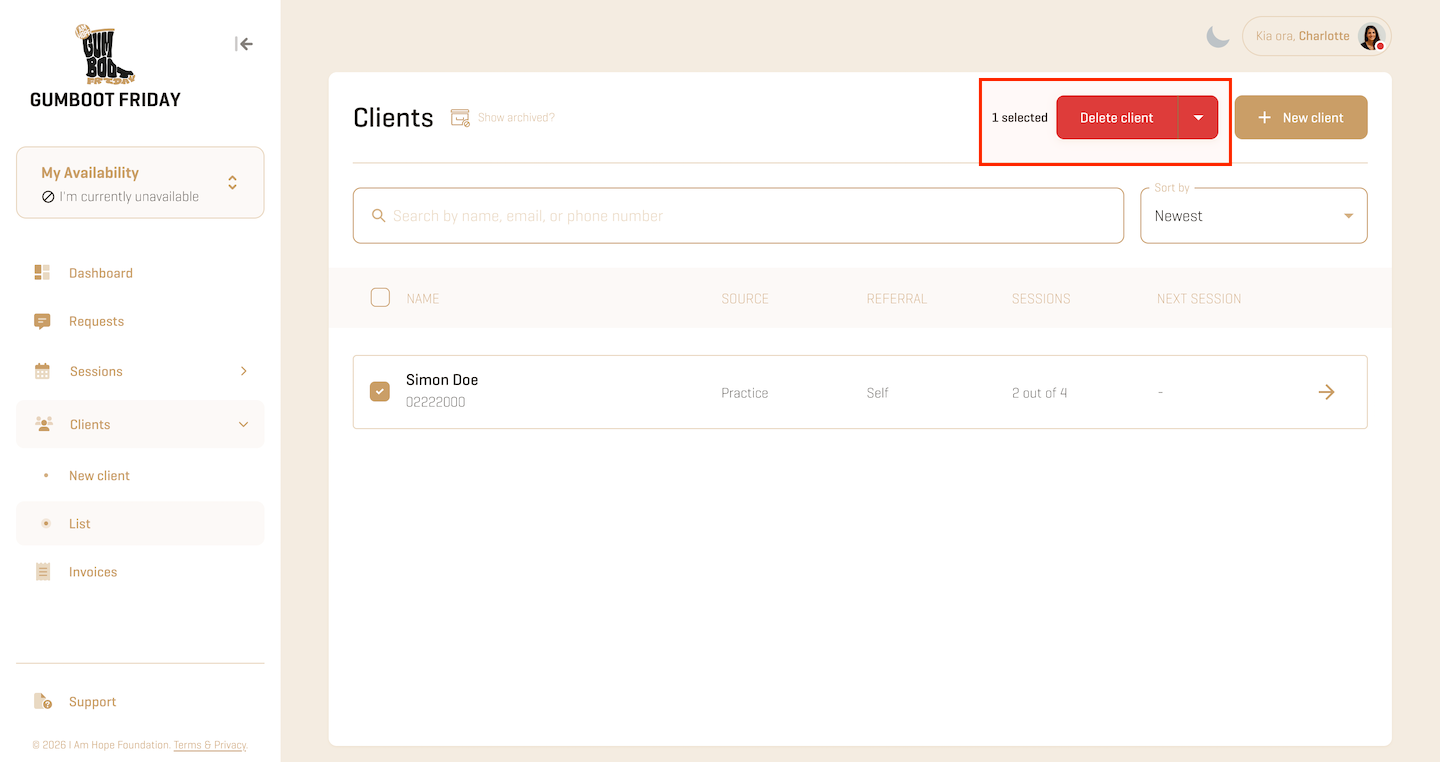
Deleting a client
To delete a client, please follow these steps:
We process payments on a fortnightly basis. To ensure payment, we kindly request that you keep all your session statuses up-to-date in a timely manner.
All associated payments due will be automatically processed every fortnight. This automatic generation happens every second Wednesday at midnight, covering a fortnightly period from Monday to Sunday prior to the invoice generation date.
Ensure that your session statuses are accurately updated in our platform.
If a young person cancels a session, make sure to update the status to 'Cancelled'. Once a session is completed, mark it as 'Completed'. Similarly, use the status 'No show' for sessions where the client doesn't show up.
All associated payments due and invoices will be automatically processed and created every fortnight. This automatic generation happens every second Wednesday at midnight, covering a fortnightly period from Monday to Sunday prior to the invoice generation date.
To update the status of a session, please follow these steps:

Expected payment dates are as follows:
Payments are made on a fortnightly basis. To view when a session will be processed for payment, please follow these steps:


To check if a session has been paid for, please follow these steps:
Alternatively, you can navigate to the client's sessions tab, where the session will also show the status ‘Completed (invoiced)’.
To view and download your invoices, please follow these steps:


We do not currently fund no shows or cancellations. However, marking a session as "No Show" or "Cancelled" does not impact the number of sessions allocated to a client. This ensures that you can still access the same amount of funding.
We appreciate that No Shows and Cancellations put pressure on your practice. We allow practitioners to apply their own No Show/Late Cancellation policies provided they are sufficiently communicated when booking sessions with a client.
To enable or disable GST, please follow these steps:

The 'Paid' section displays the total amount of all completed payments. The 'Processing' section shows the amount currently being processed through the bank's batch payment system, which will be credited to your account within the next day. The 'Donated' section reflects the total of tax-deductible donations you have made to Gumboot Friday, based on past invoices. The 'Pending' section represents the combined total of all future payments, including all sessions in payment runs beyond the next one. This total encompasses sessions that are either 'Booked' or 'Completed'.
It's important to note that 'Pending' does not indicate the amount expected in the next payment. Instead, the next payment often reflects a portion of the Pending total (for those sessions within the forthcoming payment period) moving to 'Processing' every second Thursday, and subsequently to 'Paid'. It's unlikely that the Pending amount reaches $0, as this would imply there are no future sessions booked.

If you have had sessions paid whilst "Donate some back" has been set, you can download a Donation Tax Receipt. To do so, please follow these steps:

To update the bank account linked to your account, follow these steps:

ThoughtScore, a tool based on the Multidimensional Students’ Life Satisfaction Scale (MSLSS), is our youth emotional well-being assessment tool. Using this tool can help you recognise how your clients feel. The client answers multiple-choice questions about how they see themselves, how they think others see them, and their family relationships. This provides you with insights on how to better understand them and identify areas in their life where help and support are needed.
You can send our ThoughtScore questionnaire directly to your clients. This can be done at any stage — before their session to prepare or afterwards to monitor progress.
Please note that you need your client's email to send the questionnaire.
To send the ThoughtScore questionnaire to one of your clients, please follow these steps:

Once the client has completed the questionnaire, you can view their responses on their client profile. Click on 'View response' to read their report.


If you have any questions, feedback, or concerns, please don't hesitate to contact us at help@gumbootfriday.org.nz. We will get back to you as soon as possible. If you need technical support, please include a screenshot or photo of your screen. This will help us identify the issue you're experiencing. Thank you for your invaluable work supporting the young people of New Zealand.

